Outcomes of this Guide
Understand what lighting can do for a theatrical production
What a lighting board is
Learn how to turn on and off a lighting board
Learn how to turn on and off any light connected to the lighting board, controlling lights both individually and concurrently
Learn how to load and create showfiles within the lighting board software
Learn how to navigate parts of the lighting software
Learn how to view and interact with the "Magic Sheet"
Before You Begin
If you’ve done any lighting before, you may be familiar with analogue lighting boards. They are similar(ish) enough to what we use that some skills are transferrable but you will still have a learning curve. At Scarlett, we have a digital lighting board. The main difference between the two is that digital boards run as an application on a computer. This means that, among other things, we can utilize the power of automation to create and run our shows. Every cue is pre-programmed and is therefore precise and repeatable. Plus, it makes it easier for operators to run shows, or stand-ins to take over when people are sick. Plus, we can create animations and time-critical moments. In a theatre like ours that has upwards of 50 lights active at a time, having a digital system becomes a necessity.
If you read this, you will know the absolute basics of controlling lights with our lighting board in our theatre.
What does the lighting board actually do?
In its simplest form, it is a playlist. When designing the show you create ‘looks’, which are basically just combinations of lights that look nice together and work with whatever is happening on state. There are a lot of different looks we have to swap between throughout a show, so we add these looks to a playlist (or cue list as it’s called). Then, when running the show, we don’t have to redo all the work of setting up a look, we can just hit a single button and the cue is loaded.
Parts of the lighting board
The board is basically just a specialized game controller. Like video games, you can play them using a keyboard, but you can also use a controller designed for the sole purpose of playing games. The main part (the scary looking part) is the board itself. We call it the console. It has a bunch of buttons with words on them that don’t make sense. It might also have a bunch of slidable controls connected to it. Apart from that, the rest is just a normal computer. There is a less-scary keyboard, mouse and monitor connected that work as well.
Prenote
Throughout most lighting pages, you will occasionally see boxed text that look like . These indicate a button on the console to press. if you tap or hover over them with your mouse, you will see an overlay that shows you where the button is on the keyboard.
Power
Turning on and off the console
Press the and then wait for everything to turn on. When the board is ready, the displays will show useful information that you might not understand yet. You will also be able to control the lights.
To turn off the console, you have a few options:
The first way (which is the easiest) is to just press the button again. This will pop up a screen on the monitor asking if you really want to shut down, either use the mouse to hit ‘OK’, or just click the power button one last time.
The second way is done from the monitors, using the mouse, click the upwards facing triangle in the bottom right corner of the screen. If you don’t see one, the panel might already be open, in which case there will be a downwards facing triangle somewhere in the lower third of the right-hand part of the screen
In the screen that says “Browser: file”, just below “> File”, click “Power Off”
Showfiles
A showfile is basically just like any other document on a computer. Just like you might have different word documents for different assignments or images in your phone, a showfile is just a bunch of data related to a certain show. If you’re in the wrong file, you won’t have the right cues, or even worse, you could accidentally erase someone elses cues.
Loading Showfiles
It’s good practice to first save whatever file you’re in. Do this by either clicking and at the same time, or by going to the file browser, clicking “File”, then clicking “Save”
If you can’t see the browser and you are confident you should be able to, click the key a few times. If that still doesn’t resolve it, refer to Troubleshooting
Once you have saved, go to the browser, go to “File”, click “Open”, and then click “Show File Archive”. You should see a bunch of folders. For demonstration purposes, click “!Mainfile”, then double click MAINFILE…..esf.
Creating New Showfiles
A new showfile should be created for each unique project you work on. For example, if you work on a play in the winter, and there is another play in the spring, the spring cues should be in a new showfile. This helps with organization and clutter.
This may seem counter intuitive, but we hardly ever create brand new showfiles from scratch. There is a lot of set up work involved to do that, so instead, we just copy the main one (it’s called MAINFILE). To copy the mainfile, we first need to open it up. So let’s do that now, using the instructions in the last step, open the MAINFILE in the file browser.
Once it’s open, we can copy it. Go back to the browser, click “File”, click “Save As”, double click “Show File Archive” and it should ask you to type a name, you can use the keyboard for this. When you’re done, hit enter (either on the keyboard or the console).
The name you entered should appear at the top middle of the monitors. If it doesn’t you might still be in the mainfile. Go to the file browser, and open the one you just created. It should be under the “Show File Archive” directory.
Controlling Lights
First Steps
So far, we’ve just talked about logistical stuff. It’s necessary, but it’s boring, so let’s play with lights.
Each light in the theatre has been assigned a number. We call them channels. This allows the computer to send out information regarding what channels should be on. You don’t need to memorize the numbers lights are assigned, in fact I strongly recommend you don’t.
To turn a channel on or off, we follow these steps
- What light do we want to change
- What’s its number?
- What do we want to change it to?
For this, we will be using the command line. If you have any coding experience, this will probably feel pretty natural to you, but it’s not hard to pick up otherwise.
Go ahead and try this command right now:
You should see a light turn on.
Now try the same command, but instead of pressing “Full”, type a number between 0 and 100, then hit enter. You should see the same light turn on, but at a different intensity
Lastly, try spinning the on the right hand side of the console up and down. You should see the light get brighter and dimmer depending on which way you spin it. This is called the manual control knob.
Congrats! You now know the basics to turning lights on and off. Before you go any further, let’s talk about warming up.
Warming up lights
The lights in the theatre are old. Old lights don’t like temperature changes, so to stop them from exploding we warm them up first. It’s not hard to do this, but you will have to wait for a few minutes for the lights to actually get warm.
To do this, all you have to do is go into cue 0.2. Do this by clicking the button until the number in the highlighted number in the bottom left corner of the console screen says 0.2. All the lights should dimly turn on. Wait in this for no less than 3 minutes.
Practical Use
So far you’ve turned a single light on and off. Let’s expand on that a little. First, so we aren’t blindly typing channel numbers, let’s find a list of what channel controls what light. This is where our lighting board really shines.
Tabs and Monitor Control
For this, we will primarily be using the monitors, close to the bottom of each monitor you should see a plus button typically on the right-hand side of a list of names. This is the tab navigator. The easiest way to think of the tabs is like a web browser. You can switch between tabs by left-clicking on them, and you can have the same tab open multiple times. To open a new tab, click the plus button and it will pop up a bunch of options on the monitor you clicked the plus on. To close a tab, click onto it, then hit escape, or right-click on the tab in the navigator and hit close. Each tab has a number, which identifies what type it is.
There are a lot of tabs for you to pick, but you will only really be using about 4 of the options. Those are:
- Live Table (In the left-hand column) (Tab 1)
- PSD (In the center column) (Tab 2)
- Magic Sheet Browser (In the center column) (Tab 3)
- Color Picker (In the right-hand column) (Tab 27)
The Live Table
This shows the current state of every light the board is controlling, most useful for quickly glancing at whether or not a channel is on. Like the PSD, at least one instance of this tab must always be open.
The PSD (Playback Show Display)
When you record cues, they will appear here, when running a show, this is the file you have open. It contains all the useful information for show playback. You can never completely close this; at least one instance of this tab must always be open.
The Magic Sheet
Read below…
The Color Picker
For our multicoloured LEDs, this is the easiest way to change their colour.
The Magic Sheet
This is the most graphical way to control lights in the theatre. It works like a web page, and puts everything into nice looking and labelled boxes and buttons. Most experienced lighting designers (even in the industry) use magic sheets to some extent. To use ours, first open the magic sheet tab (Make sure you don’t accidentally open Tab 14). We have a couple magic sheets that we like to use. The one that is used most often and the one the guide will be using is the one that looks like this:
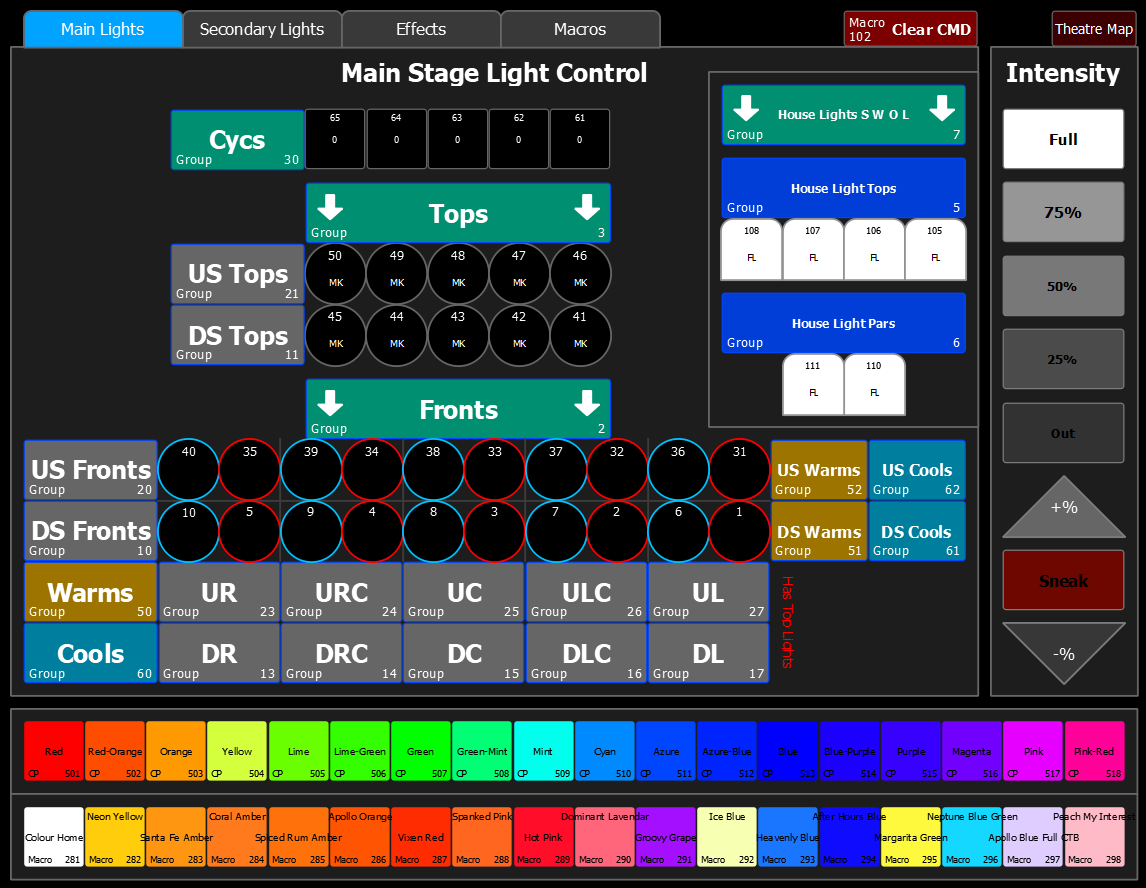
The map shows a simplified display of the theatre. You can click buttons to directly select lights (the same as if you were to type the number into the command line, like we did above). Some buttons select multiple lights at the same time, more on that in a moment. At the top of the sheet, there are a few tabs that say “Main Lights”, “Secondary Lights”, “Effects”, and “Macros”. Make sure to check out the tabs to familiarize yourself with the information provided, but don’t worry about the last two for now, they will be explained on another wiki page.
Using the mouse, left-click like you would on a webpage to click buttons and hold down right-click to pan the magic sheet around. You can also use the scroll wheel to zoom in and out.
Once you have selected a light, you can use the , , and , syntax just like you were above.
Controlling multiple lights at the same time
Now that we can see where every light is we can start doing some more practical design work.
Only changing one light per action ends up being slow and inefficient, especially when working under a time crunch, like right before a show. We can use extensions to the syntax you already know to select multiple lights. Try this command now.
You should see every front light turn on at full brightness. selects every light between 2 numbers you provide (in the example above, you selected all lights between 1 and 10, including channel 1 and channel 10).
You can also discretely select multiple channels:
Both choices have their obvious pros and cons. The pro of thru being you can quickly select hundreds of channels with one command, and the benefit of discrete being you can select multiple channels with wildly different numbers.
There are three other ways to select multiple lights as well:
Groups
Groups are predefined sets of channels. For example, you could have every light pointed at downstage left in a group, so instead of having to memorize that channels 3, 5 and 13 are pointed there, you could just type Group 4. Try this command:
You should see every single light in the theatre turn on at 50%.
I personally use groups more often than selecting individual channels. You can imaging that in large venues like the Jubilee with hundreds of lights, selecting each light one-by-one isn’t feasible
Selecting Directly From the Magic Sheet
I briefly mentioned before that you can click buttons on the magic sheet to select channels. Well you can also click multiple channels at the same time to do exactly the same as if you were typing it in the command line. The larger labels for groups of buttons are, you guessed it, group selectors.
Using the Faders
Faders (the black slidey things to the side of the console) are basically just fancy groups. Instead of having to type in the group name every time, you can just move the slider up or down. Plus, it also acts like a scale. If you want to turn a group on at 50%, you move the corresponding slider 50% up the track. These are great in shows when you have groups that you always use at slightly different intensity levels. They are also great in improv shows because they offer a lot of control very quickly.
Conclusion
That is about all you need to know in order to interact with lights. Now you can move onto the levelled guides. Level 1 will, among other things cover recording cues like you would for a show.
Take a break, grab something to drink, and when you’re ready, Continue to next level