Outcomes of this Guide:
Control multicoloured lights and lights with additional non-intensity parameters
Record and playback a basic lighting cue list
Learn how to close and reopen the software without shutting down the lighting board
Learn the usage of some less-commonly used but useful keyboard buttons
Learn a couple of shortcuts the significantly increase speed
Completely understand how to use the tab system in the lighting software
Now that you have a basic understanding of how to use the lighting board, these guides can become less bloated and start to only contain the information that is absolutely needed. With that being said, there are still a few things you should learn ASAP.
Controlling Multicoloured Lights
We don’t have a lot of these types of lights in our theatre, but we do use them often enough that it is very important that you know how to control them. Luckily it is very easy to do this.
First, select a multicolour light or group, such as the cyc. Now you have three options: 1) Use the Colour Picker tab, 2) Use the Magic Sheet, or 3) Use the Encoder Wheels
Controlling via the Colour Picker
On the monitors, select or open a new colour picker tab (refer to the previous guide if you need a refresher on how to do this). Then, ensuring you still have the light or group selected, click on a new colour.
Controlling via the Magic Sheet
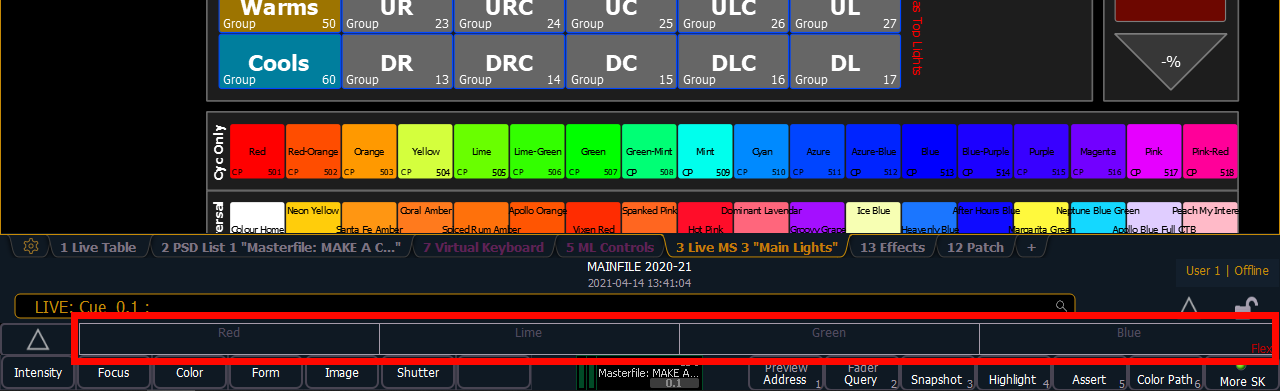
At the bottom of some of the tabs of the magic sheet, there are two rows of coloured boxes. These act as a great way to quickly get a colour on stage when you’re in a pitch or want to find ‘something close’. The top row is specifically designed for the cyc, and will only work for the cyc LEDs. The bottom row will work for any LED, but was designed for the scrollers (each colour is a frame in the scroller unit). See the next section for more information on lights with non-granular colour control.
To use this, simply select a light and then click or tap a colour on the magic sheet. If the light is compatible with the colour, it will just work, otherwise it will try its best.
Controlling via Encoder Wheels
At the top of the console keyboard, there are 4 wheels. These are the . They allow you to control each individual parameter for lights. First, you need to make sure the encoders are in colour mode. On the Ion Xe, you can see what mode you are in at the bottom of your main monitor. From now on, this will be known as the encoder display. It is highlighting in red below:
To change to colour mode, either click the up triangle to the right of the section highlighted in red then click Color, or hold down Encoder Page and click Color.
Some modes have more than 4 properties. You can check this by clicking the same triangle as described above. Each mode says how many pages of properties there are.
When you select a channel or group, if those lights have the currently displayed properties, their values will appear in the highlighted section. For example, if you select the cyc, it’s red, green and blue properties will appear in the respective boxes. When you see this, you’re all set. Spin the encoder wheels for each box to granularly control each property.
Lights with Colour Properties, but Not Granular Control
This is specifically for the scrollers, but other lights have this as well. Instead of having LEDs, scrollers change colour by moving a coloured gel in front of regular light, this means that the colours you can use are limited and predetermined.
If you are changing the colour of a light like this via the colour picker, you will notice that the crosshair will snap to certain points. These points represent the frames in the unit.
I find it best to use the encoder wheels to change these lights. This way, not only do you not have to worry about what colours you can use, you also get to see some of the wonderful names that companies use for their colours. I strongly recommend you learn how to use the encoder wheels as you will use them as often, if not more often, than the manual wheel.
Controlling Lights with Other Non-Intensity Parameters
This is very similar to controlling colour, in fact it is functionally identical. The only difference is that with colour, you got a colour picker tab, now you don’t.
To change any parameter on a light, select the encoder mode and the light(s), then spin the encoder wheels. Some example of this are:
- Using focus mode to change the rotation and angle of a moving light
- Using image mode to change the light patterns of a fancy LED
- Using form mode to change the strobe intensity of an LED light
Now that you know how to control every type of light in the theatre, you can start recording cues with them.
Recording and Playing Back Cues
Recording
Recording a cue follows this general structure:
1) Set the lights to how you want them
2) Record the cue
3) Repeat
Setting the Lights
Using everything you’ve learned up to this point, turn lights on and off, change their colours, and adjust their parameters. Once you have something that you like, move on.
Recording the Cue
Whenever you record, by default it will automatically take a snapshot of the current lighting conditions and save it to the list. Simply type the following command:
(Replace numbers with the number you want the cue to be. The number must be a positive, 1-4 digit number that can optionally have up to 3 decimals.)
To see your cue list, use the PSD tab on the monitors (Tab 2)
Fixing Cues
Simply follow these steps:
1) Use the playback instructions that follow to load the cue you want to edit, or type and the number of cue you want to edit.
2) Make your changes
3) Use the exact same record command as you did when you originally saved the cue
Deleting Cues
You will often find a cue becomes redundant or so wrong that it is easier to just restart, to delete a cue simply use this command:
(Number represents the ID of the cue you want to delete. The second enter is to respond to the “Are you sure you want to delete that cue” prompt.)
Playing Back Cues
You will use 2 buttons here: Go and Stop / Back
: Advances your cue list by one cue. In a perfect show, this is the only button you have to press.
: moves your cue list back one cue or stop the current transition (if one is active).
On the PSD, you will see a bunch of numbers beside the cue number. These are the transition timings. We won’t be using these in this guide but we will in the future. To put it simply, the software allows you to change the timings for each part of the cue, for example you could have a colour change take 15 seconds, but an intensity change only take 4.
If you hit Stop / Back when one of these transitions are occurring, instead of going back one cue, it will just pause the current transition timer until you hit go again.
The board colourizes the PSD pretty well, use the colour prompts to figure out what cue you are in:
- Yellow - Cue is active
- Red - Transitioning to this cue (see the
Durcolumn for time remaining in the transition) - Nothing - Cue is inactive
We will cover transition timings as well as other cue recording techniques in Level 2
Using the Monitor Tabs
You already know how to open new tabs, this section will provide a little bit more instruction.
For this section, you will be only using the mouse and QWERTY keyboard, not the lighting keyboard.
First, most tabs have a right click function as well that allows you to configure some settings. For example, right clicking on the Magic Sheet tab allows you to access the Magic Sheet Browser, meaning you can change the open Magic Sheet without having to open a new tab.
Another example is the colour picker. Right clicking this tab will allow you to change the visible elements of the page. For example, if you don’t like the default colour picker, you can change it to a Hue/Saturation wheel or RGB picker.
Next, you can quickly close any closable tab by hitting escape on the keyboard when the tab is active on the monitor. If you have multiple monitors with tabs open, you can tell which tab is active based on whether there is a yellow border on the screen. Lastly, to quickly change tabs or open new ones, instead of having to click through menus, you can hold down Tab and type in the tab ID. Plus, you can do this on either keyboard. For example, typing Tab 1 will open the Live Table.
Closing
Congrats! You should now have all the knowledge you need in order to program at least mostly independently. The next 4 guides will be about expanding your knowledge and covering concepts that are useful in more and more specific situations.
If you want to get ahead right now, have a look at this supplementary guide. It covers a few common shortcuts that you will definitely use once you know them.
I also recommend you look at this practice assignment. Use all the skills covered up to this point to build a basic showfile.
When you’re ready, Continue to next level.